Quick Access
This article contains instructions on how to use Shares to promote the data in your project.
Creating a share
- The share button is located at the bottom-right of your screen.

- A share has three customizable fields. A Name, Basemap, and a Description.
- Once the share is created, you can go view it. To toggle all the data in the share, click on the S icon at the top-left of the screen.

Date
The date of the share is located at the top-left of the share card, next to the calendar symbol. This is the creation date of the share.
View count
The view count is located at the top-right of the share card, next to the eyeball symbol. The view count shows how many people have visited the share.
Status
The status of a share can be toggled from Active to Inactive and vice-versa. If the status is Inactive, no one will be able to view the share.
Editing your share
- Click on the S icon to show the Smart Site Plan Menu.
- Navigate to Account.
- In Account, you will find the Share’s section.

- Clicking on your share will bring up the share settings.

Date
The date of the share is located at the top-left of the share card, next to the calendar symbol. This is the creation date of the share.
View count
The view count is located at the top-right of the share card, next to the eyeball symbol. The view count shows how many people have visited the share.
Status
The status of a share can be toggled from Active to Inactive and vice-versa. If the status is Inactive, no one will be able to view the share.
View share
The view share button, in green, can navigate the owner to the share directly.
Delete share
Clicking Delete share, in red, will permanently delete the share and the data included. There is no way to recover this data without contacting customer support.
Copy
Located in the footer, at the bottom of the card. Clicking Copy will put the URL of the share on your clipboard.
Embed
Located in the footer, at the bottom of the card. Clicking Embed will put the code that makes up the embed on your clipboard.
Facebook
Located in the footer, at the bottom of the card. Clicking Facebook will navigate the user to Facebook and open up the share in an editable container.
Twitter
Located in the footer, at the bottom of the card. Clicking Twitter will navigate the user to Twitter and open up the share in an editable container.
Note
The note is a disclaimer for the share. This is to make clear that all data in the share is public until the share status is Inactive or the share is deleted.
Supported data
Smart Site Plan supports the majority of the visual data that is imported, created, or sourced. All data in the share respects the order of toggle and opacity. Below is a description of each type of data.
Layers
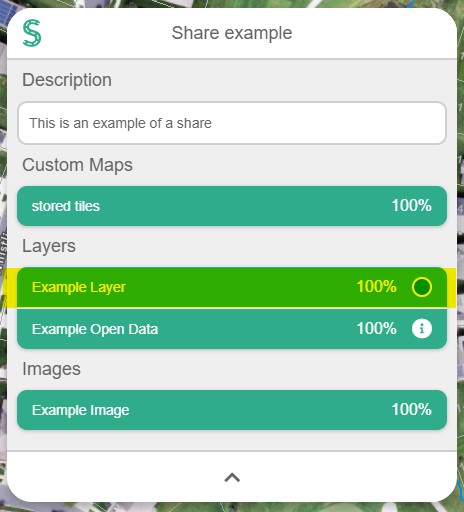
Any layer, that is on, will be included inside the created share. All of the features inside the layer will also be included, with its respected information. Note that if you have attached files inside entities, these will turn public. To remove the data from public space, you can delete or turn the share’s status to Inactive. Layers will show up under the subtitle Layers, inside the Share’s card. Furthermore, Layers always have a palette circle to the right of the name. 

Open Data
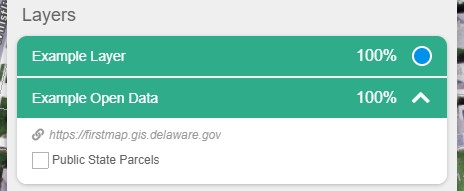
Any Open Data source, that is on, will be included inside the created share. Open Data sources will show up under the subtitle Layers, inside the Share’s card. Furthermore, the Open Data sources always have an i circle to the right of the name. Clicking this symbol will show the source’s URL and legend.

 Clicking this symbol will show the source’s URL and legend.
Custom Maps (Overlays)
Any Custom Map, that is on, will be included inside the created share. Custom Maps will show up under the subtitle Custom Maps, inside the Share’s card.

Images (Overlays)
Any Image, that is on, will be included inside the created share. Images will show up under the subtitle Images, inside the Share’s card.
